Wednesday, 26 September 2012

Third Flight Test

On Sunday we tested the vehicle for a third time with satisfying results. Last test we didn't get enough flight time to determine if the control system was working so we were all keen to see if we could get a controlled hover this time. In total we did two tests. In the first (3L of %85) the vehicle barely had enough power to lift off and we were were worrying that the engines might have gotten poisoned so we tried again with 1.5L of %90. There was a huge difference with clear exhaust and the engines having plenty of power in the second test.We have been using %85 for a while now because I thought it might be damaging/melting out catalyst but I don't think it is an issue with the stainless interleaved pack design we are now using (last pack was solid silver).  I think will use %90 for future tests as the performance is much better.  In total we got about 9 seconds of total hover in the second test although it was not supporting itself for some of the individual runs.


The only change we made to the control system was to fix the PI code to so it would update every cycle instead of every 4th or 5th as it was doing last test. The hops were not by any means perfect but the part of Bart's control system we were testing (inner velocity loop), worked well resisting rotation and we were all satisfied with the results. The main problem we were having is that when warming up the thrusters with a quick pulse before a test (they cool down quickly) the vehicle would start rocketing and so would usually have some sideways velocity which caused the vehicle to drift sideways during hovers. The other problem was that it is difficult to control the throttle manually so the vehicle would usually not have enough thrust or shoot up.

Here is the log of Roll angle, Rate and PI output for a 2.6 second hover:


As can be seen roll angle started at close to 0 and stayed within +- 0.8 Radians. I havent talked to bart since the test but I at-least am really happy with the performance considering that the system doesn't take the actual angle into consideration and only reacts once the vehicle has started to fall over so will naturally oscillate somewhat. The other thing is that Ki and Kp constants were calculated assuming 4L of peroxide and we only started with 1.5 so the system will want to under and overshoot. The changing system properties is something we need to start thinking about how to address. Next step is to add in the position loop.

We are somewhat divided on where to focus now. I think we should work on getting the altitude loop working with the laser rangefinder so we can maintain a level hover. A thought that we should work on getting absolute position so we can eliminate the sideways drift issue which would enable us to more easily refine the stabilisation system. His argument was that we already have a functioning rocket and we could dead-recon to get position for short periods if we started from stationary so why add something new. A also thought of a good idea which was starting on chocks which would fall away as soon as we take off. This would allow us to warm up the thrusters without starting the vehicle rocketing on its tether. It could also give us a fixed reference to start dead-reckoning from.

I recorded the first test in high speed at 400fps. It was really cool to see the vehicle fighting the tether in slow motion and you can see the vehicle making individual corrections and oscillating. It will take a while to edit as its really long in real time but when I get some time I will upload it. The unedited second test is on youtube here if anyone wants to see it.

After the test we were discussing future work and decided that it would be good (and useful) have a long term goal/challenge to work towards. One idea Marco/A came up with was to  be able to drop the rocket from a height and have it stabilise itself and land automatically. The current vehicle probably wouldn't have enough power to recover from a high height (maybe 20m) but wewould start by knocking it off the top of the test stand. We would probably need a positive displacement tank otherwise pressurisation gas would get in the thrusters when it falls over. We would also need a better IMU as the Arduimu goes crazy at large angles.

I am not sure if we will be able to test again this weekend as I have to go to a first aid course all day Saturday and have some uni work to catch up on so we will probally test the following Sunday.

Thursday, 20 September 2012

Data from last test.

Flight Data:

We have been going through the log from the test last sunday and picked up on a problem, The PI values not updating as fast as they should be. The stabilisation loop runs at 31Hz (same speed as the solenoids pulse at) however the PI values were updating slower. Bart figured out that we (or more specifically I) was not using the Arduino pid library properly. The library has two ways of updating itself, Automatic and Manual. Auto mode works like it sounds, the library updates values itself. Quasi-conservatelly, in manual mode you call an update command yourself. I was looking at an example which used auto mode but also called updates manually so that how I did it but apparently the manual updates were not doing anything.

Here is Pitch, Pitch PI output and Z acceleration for the longest test.


Despite the PI values not updating at the speed they should be the PI looks like it has some sort of control. I think that the rocket must have run out of peroxide because the deceleration ocors partway into the test. Either this of the steady state thrust (after the initial spike) was not enough to counter gravity. Either way the program did a good job to stabilise the rocket after it landed on the string because dropping it by hand on an angle (you can see it was at 0.6 rads when it hit) makes it go everywhere. Possibly I am just seeing what I want to see..... It could just be that the the rocket just bounced on the test stand....

Sam and Bart excited for the test!


The Improved Quick Disconnect:


My laser range finder and interface board came today. I nearly got pulled over by the police on the way back from collecting it at the post office because I was measuring the distance to the car in-front as I was driving..... excuses I thought of post-scare included... "Officer, anyone could see I trying to keep a optimal distance from the car in-front"and "What am I doing?... Well clearly I am calibrating my speedometer". If I have some spare time before sunday I will mount it on the rocket so we can get some data.


Saturday, 15 September 2012

Second teathered flight test

Yesterday (Saturday) we tried another tethered flight test. The main aim of the test was to test the roll control program. The test went fairly well but after warming up the engines and dialling in the correct amount of thrust so the vehicle would just list off we only got a few seconds of auto hover before the peroxide ran out which wasn't enough time to see if the program worked. The thrust was also a bit low so although it did look like it was stabilising itself it didn't actually lift off. It was dark by the time we had vented the tank so we decided to pack up and try again next Sunday.


We had a few issues with the vent solenoid during the test. I accidentally installed it the wrong way around when installing the quick disconnect earlier in the week and because it only seals one way, when the quick disconnect released for the first time so did the pressure in the tank. We switched it around which was not the best safety wise  as although the tank was pretty much depressurised the vehicle still was filled with peroxide. Also because the new line we are using to pressurise is so small (1/8") it takes ages to fill and we burnt out the solenoid when filling for the first time. I decided just to not use it after we had fixed the direction problem (as we don't need the vent solenoid to fill, its just quicker when its open and reaches a slightly lower pressure) which only meant that we couldn't vent at the end of the test without dumping the rest of the peroxide. The pressure transducer was working for this test which was useful good because filling took so long. I had been having great trouble getting it working (reading the transducer voltage), I eventually figured out that my particular Arduino clone needs its VREF pin connected to a something (5V) as the internal VREF doesn't seem to work or is set very low.

Burens quick disconnect worked brilliantly and was probably the best part of the test. When it was fired it came cleanly away and retracted to the top of the stand. Here is a clip of it in action:


We also tried out Sam's GUI control program which looked great but had a few teething problems. It seemed to work well when testing before the test but when we tried it out it was cutting the time of the commands short by one digit so we just switched back to manual commands. I am looking forward to using it for the next test as it makes control much easier than typing out strings and also eliminates errors, it is easy to put an extra 0 on the string and send a pulse for 10 seconds instead of 1.

It is about time we fixed a few minor annoyances on the vehicle. Firstly we need a bettwe way to mount the control box. At the moment the box is screwed together from its underside then bolted to the vehicle. We need to take it off and open it quite a bit and screwing and bolting takes a long time so I usually just tape it closed and zip tie it to the rocket. It would be great if we could just clip it to the rocket. Also it is annoying to have to open the box every time to get the SD card out. A sd card extension cable is one option but a simpler idea would be to just add in functionally to download the file from the controller after the test. We might be able to do this over LAN because the Arduino has a ethernet port on it. Another thing that is annoying it how we fill. At the movement we fill with a funnel through the front 1/4" port and just before the test screw in the pressure relief plug. The port is in a bit of a awkward position and it is difficult to fill and install the plug. Also we ahev to put thread tape on each time and occasionally when unscrewing a little tape gets in the tank. It would be great to have some sort of quick disconnect system where we can just pop off and on the plug and having the filling stem out from the tank.

Wednesday, 12 September 2012

Electronic Frustration.


On Tuesday night I was about to try out the control system out  with compressed air and was fiddling with a 5V wire when I shorted it on something and fried the Xbee. I am not entirely sure how this happened since what I touched wasn’t connected to the xbee but the end result is it now only outputs dots over serial and won’t respond to any commands (programing or otherwise). Luckily everything else was fine. The lesson…. Fuse your electronics!  I have ordered a replacement, hopefully they will get here before the weekend. 

Sunday, 9 September 2012

Delayed Test.

We have a new member to the group. Bart Hertog is a control systems engineer living in the Netherlands. Bart will be working on the vehicles control system and implementation.

Bart has designed a system that is based on two PI loops for roll control. There is a inner velocity loop that takes roll rate and an outer position loop that takes absolute position.

The plan was to test/tune the velocity loop on Sunday (yesterday) but after a full day of programming on Saturday I was tired, frustrated and starting to make mistakes so I decided postpone a week rather than rush to test something that was not ready.

Bart also had a really good idea to stop an auto hover if the roll/pitch became greater than 45 degrees. This is a really good safety mechnism.

If you think of the output from the control loop as a desired torque the main problem so far has been how to best convert the torque into 3 thruster forces in a way that maintains the desired thrust and also stays within the limits thrust that the thrusters can actually produce. Also the fact that we don't know exactly how much thrust the thrusters can output doesn't help.

We still need to make a proper battery mount to avoid the last minute duct tape we used after the battery came loose last time.

Buren has re-made the remote quick-disconnect with two solenoids which seems to work well so we shouldn't need to use the line cutter for the next test. He has also made a counterweight system so the solenoid and line will be automatically pulled to the top of the test stand after it is disconnected from the vehicle.

Nick is currently looking into a RTK gps system. He wanted to use a beagle board as the fixed base station but I would prefer to just use a computer. We will probably want to get another data modem just for the RTK system.

Sam is working on the control GIU which sends strings out via serial.


Tuesday, 4 September 2012

Laser Rangefinder

Determining altitude is trickier than it may seem. An IR range finder will not work due to the heat of the engines and ultrasonic wont work because of the noise. The only real options left are Radar or a laser.

I have looked lots of  laser range finders but they are all either expensive or not suited to my application. There are plenty of cheap "laser tape measures" but all display the distance on a built-in screen and attempts by others to modify them  have been limited to hacking the segment display. Parallax make a reasonable priced sensor but it uses triangulation (with a camera) instead of time of flight and I think that the cloudy exhaust might interfere and also only works at 1Hz. There are heaps of industrial ones but none under 1K$.

Today I came across this:


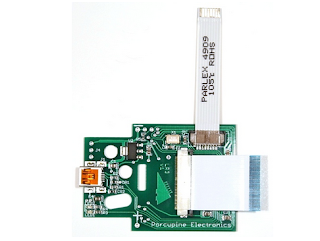
Its a board  by Porcupine Electronics that connects to a fluke 411D (laser range finder) and outputs the distance data over USB and serial.:


The display and keyboard is removed and replaced


Apparently it can output at 10Hz with +- 3mm accuracy from 10cm to 30m. Also it will be quite light as the housing can be removed and the electronics themselves wont weigh much. 


Saturday, 1 September 2012

Data Data Data

As it turns out the reason the plots of roll and pitch (refer to last post) looked so strange is because the script I wrote to extract them from the log file couldn't handle variable length strings and as such had a preference for positive numbers. Here is what it should look like:


I have also been doing some vibration testing of the IMU. One of my main concerns is that the vibrations from the solenoids/engine thrust will mess with the IMU's measurements. My first thought for generating vibration was to use a vibration motor but I didn't have one handy and I couldn't find any information on the frequency of my mobile phone vibrator so I used a large speaker (subwoofer).

Here is a plot of roll and pitch with the IMU on the speaker housing with a sine wave sweep from 20-300Hz. When stationary roll and pitch have an error of about +-0.3 degrees.


Sin sweep from 10-100Hz (horizontal scale is wrong):


I noticed that some frequencies sounded much louder than others. At first I thought this was because the ear filters out some frequencies but feeling the enclosure some frequencies definitely felt like they had a higher amplitude.

I used a iPhone app called "Vibration" to measure the amplitude of the speakers vibration (20-300Hz) which can be seen bellow (vertical axis is G's). The other option was to get the IMU to output raw acceleration data.


As can be seen the amplitude is highest at about 100Hz and 250Hz. I these are natural frequency of the speaker/housing? I am also not sure what filtering the speakers do so its possible that they filter out certain frequencies.


Because the amplitude of the vibrations vary so much I don't think any firm conclusions can be drawn but it is clear that there are some frequencies that affect the IMU more than others. Keeping in mind that the IMU was experiencing some fairly severe vibrations in excess of 2G's at peak (it was a really big subwoofer) I am happy with how it performed.

An improvement for future work would be to compensate for amplitude by scaling the raw accelerometer and data (dont think you need to change gyro data) however I am not entirely sure how you would do this in a way that didn't mess up the DCM algorithm that calculates orientation. An alternative would be to use a more consistant vibration source.

Also the test I had planed on doing tomorrow has been canceled because Buren and Sam couldn't make it. Its probably just as well because I still haven't implemented the basic roll control I wanted to test and there will be lots of bugs to fix. I have made a basic test platform which consists of 3 LED's to simulate the engine so we can see if all the axis/directions are right.